Method
- RGB Coloring
>>> font = Font(color=’00FF0000′)
>> font = Font(color=’FF0000′)
>>> from openpyxl.styles.colors import Color
>>> c = Color(rgb=’00FF00′) #RGB Color
>>> font = Font(color=c)
- Indexed Coloring
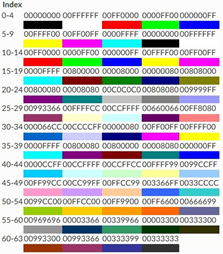
>>> c = Color(indexed=32) #Indexed Color
>>> font = Font(color=c)
- Theme Color
Set theme color using the `theme` parameter.
>>> c = Color(theme=6, tint=0.5) #Theme color
>>> font = Font(color=c)
Sample Code
#Cell Style: Setting Colors

#Import load_workbook function
from openpyxl import Workbook

#Create a new workbook
wb=Workbook()
#Get the active worksheet
ws=wb.active

#Import the Font class
from openpyxl.styles import Font
font=Font(color="00FF0000")
#font=Font(color="FF0000")

#Set font for a cell
ws.cell(row=2,column=2).font=font
ws['B2']='Test123'

from openpyxl.styles.colors import Color
#RGB color
c=Color(rgb="00FF00")
font=Font(color=c)

#Set font for a cell
ws.cell(row=3,column=3).font=font
ws['C3']='Test123'

#Indexed coloring
c=Color(indexed=32)
font=Font(color=c)

#Set font for a cell
ws.cell(row=4,column=4).font=font
ws['D4']='Test123'

#Theme colors
c=Color(theme=6,tint=0.8)
font=Font(color=c)

#Set font for a cell
ws.cell(row=5,column=5).font=font
ws['E5']='Test123'

wb.save('test.xlsx')
wb.close()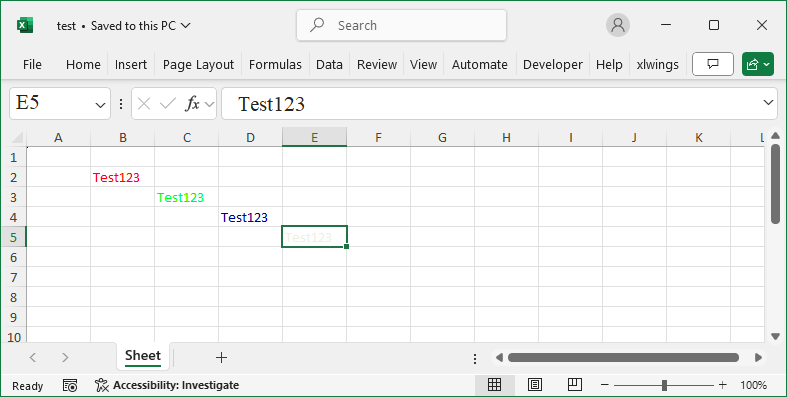
Indexed Color Table