Expand using the `expand` method of the `CellRange` object
cr.expand(right=0,down=0,left=0,up=0)
using the `shrink` method of the `CellRange` object
cr.shrink(right=0,bottom=0,left=0,top=0)
Use the `size` attribute to view the changes before and after.
Sample Code
#Expanding and Shinking Cell Ranges

#Import load_workbook function
from openpyxl import Workbook

#Create a new workbook
wb=Workbook()
#Get the active worksheet
ws=wb.active

#Import CellRange function
from openpyxl.worksheet.cell_range import CellRange

#Create a cell range object
cr=CellRange('D5:F7')
#Output the size of the cell range
print(cr.size)

#Expanding
cr.expand(right=1,down=2,left=0,up=0)
print(cr.size)
#Shinking
#cr.shrink(right=1,bottom=2,left=0,top=0)
#print(cr.size)

wb.save('test.xlsx')
wb.close()
Move a range using the `move_range` method of the worksheet object:
ws.move_range(cr,rows,cols)
The first parameter of this method specifies the range to be moved, which must be a CellRange object; the rows parameter defines the vertical movement. If the value is greater than 0, it moves down; if the value is less than 0, it moves up. The cols parameter defines the horizontal movement. If the value is greater than 0, it moves to the right; if the value is less than 0, it moves to the left.
Sample Code
#Move the Cell Range

#Import load_workbook function
from openpyxl import Workbook

#Create a new workbook
wb=Workbook()
#Get the active worksheet
ws=wb.active

#Move the cell range
#Row: >0 moves down; <0 moves up
#Column: >0 moves right; <0 moves left

from openpyxl.styles import PatternFill
ws['D4'].fill=PatternFill(fill_type='solid', start_color='00FF00')
ws['F10'].fill=PatternFill(fill_type='solid', start_color='00FF00')
ws.move_range('D4:F10', rows=-1, cols=2)

wb.save('test.xlsx')
wb.close()
#Copy the Style of a Cell Range

#Import load_workbook function
from openpyxl import Workbook

#Create a new workbook
wb=Workbook()
#Get the active worksheet
ws=wb.active

#Import CellRange class and copy function
from openpyxl.worksheet.cell_range import CellRange
from copy import copy

#Create two cell ranges
cr=CellRange('D5:F7')
cr2=CellRange('D12:F14')

#Copy the style
r=cr2.max_row-cr.max_row
c=cr2.max_col-cr.max_col
for cl in cr.cells:
      cl2=ws.cell(row=cl[0],column=cl[1])
      ws.cell(row=cl[0]+r,column=cl[1]+c,value=cl2.value)
      #If there are styles, use the `copy` function to copy them
      if cl2.has_style:
            nc=ws.cell(row=cl[0]+r,column=cl[1]+c)
            nc.font=copy(cl2.font)
            nc.border=copy(cl2.border)
            nc.fill=copy(cl2.fill)
            nc.number_format=copy(cl2.number_format)
            nc.alignment=copy(cl2.alignment)

wb.save('test.xlsx')
wb.close()
#Copy Cell Ranges

#Import load_workbook function
from openpyxl import Workbook

#Create a new workbook
wb=Workbook()
#Get the active worksheet
ws=wb.active

#Import CellRange class
from openpyxl.worksheet.cell_range import CellRange

#Create a cell range object
cr=CellRange('D5:F7')
cr2=CellRange('D12:F14')

#Copy the values
r=cr2.max_row-cr.max_row
c=cr2.max_col-cr.max_col
for cl in cr.cells:
      cl2=ws.cell(row=cl[0],column=cl[1])
      ws.cell(row=cl[0]+r,column=cl[1]+c,value=cl2.value)

wb.save('test.xlsx')
wb.close()
#Cell Style: Setting Protection

#Import load_workbook function
from openpyxl import Workbook

#Create a new workbook
wb=Workbook()
#Get the active worksheet
ws=wb.active

#Import Protection class
from openpyxl.styles import Protection

#Set protection
ws['C3'].protection=Protection(locked=False)
ws['C3']='abc123'
ws.protection.sheet=True

wb.save('test.xlsx')
wb.close()
wrapText—Whether text wrapping is allowed (Boolean).
shrinkToFit—Whether to shrink the text to fit the cell.
indent—The indent level, a floating-point number.
relativeIndent—The relative indent level, a floating-point number.
justifyLastLine—Whether to justify the last line (Boolean).
readingOrder—The reading order, a floating-point number.
text_rotation—An alias for **textRotation**, used when the property name is invalid, conflicts with a Python keyword, or is more descriptive.
wrap_text—An alias for wrapText
shrink_to_fit—An alias for shrinkToFit
mergeCell—Merges the cell.
Sample Code
#Cell Style: Set the Alignment

#Import load_workbook function
from openpyxl import Workbook

#Create a new workbook
wb=Workbook()
#Get the active worksheet
ws=wb.active

#Import the Alignment class
from openpyxl.styles import Alignment

#Set the alignment
align1=Alignment(horizontal='center', vertical='top')
align2=Alignment(horizontal='right', vertical='bottom', \
                 text_rotation=30, wrap_text=True, \
                 shrink_to_fit=True, indent=0)
align3=Alignment(horizontal='center', vertical='center', \
                 wrap_text=True, indent=3)

#Apply the first alignment style to cell C2
ws['C2'].alignment=align1
ws['C2'].value='Python123'

#Apply the second alignment style to cell C4
ws['C4'].alignment=align2
ws['C4'].value='Python123'

#Apply the third alignment style to cell C6
ws['C6'].alignment=align3
ws['C6'].value='Python123'

wb.save('test.xlsx')
wb.close()
Use the `numbers` module and the `number_format` property of the cell object to set number formats.
>>> from openpyxl.styles import numbers
There are two ways to set the number format:
1. Using the built-in constants of OpenPyXl:
>> ws[“D2”].number_format=numbers.FORMAT_GENERAL
2. Using a string representation of the number format:
>> ws[“D6″].number_format=”yy-mm-dd”
>> ws[“D8″].number_format=”d-mmm-yy”
To display numbers in scientific notation:
>> ws[“D4”].number_format = ‘0.00E+00’
The available format constants and strings in OpenPyXl are as follows:
FORMAT_GENERAL=”General”
FORMAT_TEXT=”@”
FORMAT_NUMBER=”0″
FORMAT_NUMBER_00=”0.00″
FORMAT_NUMBER_COMMA_SEPARATED1=”#,##0.00″
FORMAT_NUMBER_COMMA_SEPARATED2=”#,##0.00_-“
FORMAT_PERCENTAGE=”0%”
FORMAT_PERCENTAGE_00=”0.00%”
FORMAT_DATE_YYYYMMDD2=”yyyy-mm-dd”
FORMAT_DATE_YYMMDD=”yy-mm-dd”
FORMAT_DATE_DDMMYY=”dd/mm/yy”
FORMAT_DATE_DMYSLASH=”d/m/y”
……
Sample Code
#Cell Style: Setting Number Formats

#Import load_workbook function
from openpyxl import Workbook

#Create a new workbook
wb=Workbook()
#Get the active worksheet
ws=wb.active

#Import numbers class
from openpyxl.styles import numbers
import datetime

#Set the number format
ws['D2']='Test123'
ws['D6']=datetime.datetime.today()
ws['D8']=datetime.datetime.today()
ws['D4']=123.456789
ws['D2'].number_format=numbers.FORMAT_GENERAL
ws['D6'].number_format='yy-mm-dd'
ws['D8'].number_format='d-mmm-yy'
ws['D4'].number_format='0.00E+00'

wb.save('test.xlsx')
wb.close()
left、right、top、bottom、diagonal—Define the left, right, top, bottom, and diagonal borders, as **Side** objects.
diagonalDown、diagonalUp—Boolean values, define the direction of the diagonal line. It can be drawn from the top-left to bottom-right, or from the bottom-left to top-right.
A Side object represents a border, which is a line-shaped graphical element. Its main properties include the line style and color. The constructor for this Side object is as follows:
Side(style=None, color=None, border_style=None)
Where:
style—The border style, which must be one of: “hair”、“dashed”、“mediumDashDot”、“mediumDashDotDot”、“slantDashDot”、“double”、“thick”、“mediumDashed”、“thin”、“medium”、“dashDotDot”、“dashDot”、“dotted”。
color—The color of the border.
border_style—An alias for style.
Sample Code
#Cell Style: Setting Borders

#Import load_workbook function
from openpyxl import Workbook

#Create a new workbook
wb=Workbook()
#Get the active worksheet
ws=wb.active

#Import Border class and Side class
from openpyxl.styles import Border, Side

#Set cell borders
#Use the Border function to create individual borders
ws.cell(row=4, column=4).border = Border(left=Side(border_style='thin', \
            color='FF0000'), right=Side(border_style='thin', \
            color='FF0000'), top=Side(border_style='double', \
            color='FF0000'), bottom=Side(border_style='double', \
            color='FF0000'))

wb.save('test.xlsx')
wb.close()
patternType、fill_type—The pattern fill type, its value must be one of the following: “darkDown”、“gray0625”、“mediumGray”、“darkHorizontal”、“lightVertical”、“darkGrid”、“lightGray”、“darkTrellis”、“darkVertical”、“lightGrid”、“solid”、“lightDown”、“lightUp”、“darkUp”、“darkGray”、“lightTrellis”、“lightHorizontal”、“gray125”、None。
fgColor、start_color—Foreground color, the value of fgColor must be a Color object.
bgColor、end_color—Background color, the value of bgColor must be a Color object.
When **fill_type** is set to None, no fill will be applied.
When **fill_type** is set to ‘Solid’, it will be a solid color fill.
Sample Code
#Cell Style: Pattern Fill

#Import load_workbook function
from openpyxl import Workbook

#Create a new workbook
wb=Workbook()
#Get the active worksheet
ws=wb.active

#Import PatternFill class
from openpyxl.styles import PatternFill
from openpyxl.styles.colors import Color

#Pattern fill
ws['B2'].fill=PatternFill(fill_type=None, \
            start_color='FFFF00', end_color='000000')
ws['C2'].fill=PatternFill(fill_type='solid', \
            start_color='00FF00')
ws['E2'].fill=PatternFill(fill_type='lightGrid', \
            start_color='FFFF00', end_color='000000')
fill=PatternFill(fill_type='lightTrellis', \
            fgColor=Color(rgb='00FF00'), bgColor=Color(rgb='0000FF'))
ws.column_dimensions['B'].fill=fill
fill=PatternFill(fill_type='lightGray', \
            fgColor=Color(rgb='FFFF00'), bgColor=Color(rgb='0000FF'))
ws.row_dimensions[4].fill = fill

wb.save('test.xlsx')
wb.close()
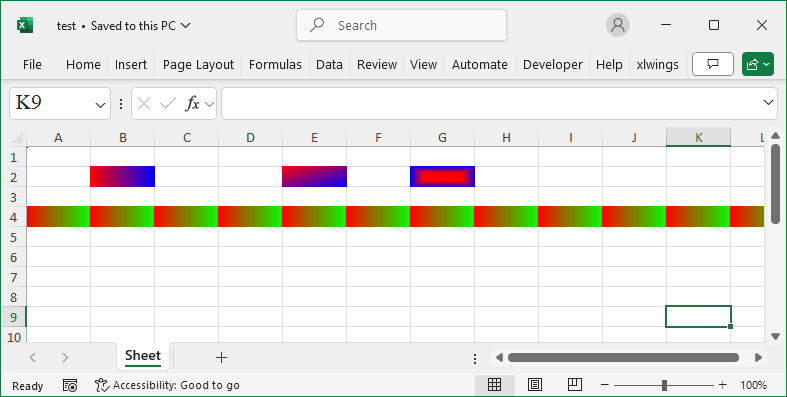
#Cell Style: Gradient Fill

#Import load_workbook function
from openpyxl import Workbook

#Create a new workbook
wb=Workbook()
#Get the active worksheet
ws=wb.active

#Import GradientFill class
from openpyxl.styles import GradientFill
#Apply gradient color fill to cells
#Linear gradient: gradient from one side of the cell to the other
#Path gradient: gradient from the four edges of the cell inward
ws['B2'].fill=GradientFill(type='linear', \
        degree=0, left=0, right=0, top=0, bottom=0, \
        stop=['FF0000','0000FF'])
ws['E2'].fill=GradientFill(type='linear', \
        degree=45, left=0, right=0, top=0, bottom=0, \
        stop=['FF0000','0000FF'])
ws['G2'].fill = GradientFill(type='path', \
        left=0.2, right=0.8, top=0.3, bottom=0.7, \
        stop=['FF0000','0000FF'])
ws.row_dimensions[4].fill=GradientFill(type='linear', \
        degree=0, left=0, right=0, top=0, bottom=0, \
        stop=['FF0000','00FF00'])

wb.save('test.xlsx')
wb.close()